
The objective of this project is to harness the power of a smartphone to create a low-cost intelligent robot.
This report demonstrates the steps involved in building an Android controlled robot that can self-navigate to any given GPS location.
Until recently, mobile robots were controlled by individual sensors such as gyroscopes, accelerometers and distance sensors in conjunction with micro-controllers in order to operate.
Nowadays, with smartphones widely available and affordable, robots can be controlled in a new way. Smartphones are equipped with a rich variety of sensors that have the capability to control a highly functioning robot.
Whether realise it or not, robots are an integral part of day-to-day life in the 21st century. There are currently a vast number of uses for robots and these are constantly growing and evolving as technology develops. We see this as robots replace many manual tasks, from domestic chores all the way through to industrial automation. The potential role and opportunities for robots both at home and in the workplace are truly endless.
This project investigates the creation of a robot for navigational purposes that is controlled by a smartphone – a robot that can self-navigate to any given GPS location.
Smartphones are equipped with a large range of sensors such as accelerometers, gyroscopes, compasses, GPS receivers, hi-resolution cameras and screens. Because of this, smartphones can replace individual sensor components and act as one ‘brain’ for a robot.
Not only are these robots highly functioning, they are also more cost effective to build. Traditionally, each sensor would have to be purchased separately in order to build the robot. Smartphones provide all these sensors within one device allowing a far cheaper solution for the build.
In addition to built-in sensors, Smartphones also have features such as cameras, microphones, speakers and GPS receivers, which enhance the functionality of the robot.
On Click Listener
The final application that controls the robot will operate using different colours (light intensities) on the screen of the smartphone that will then be read into the microcontroller’s ADC. These values will then change the state of the robot.
In order to successfully build the final application, experience with handlers such as the “OnClickListener” and the “LocationListener” was required. To achieve this, an app that responds to button clicks by changing colours on the screen was created.
An “OnClickListener” is alerted when a user either clicks, touches or focuses on any widget like button/text/ image etc. The on click event handler is trigged by the “OnClickListener” to respond appropriately to this. Android developer guide UI Events: (developer.android.com/guide/topics/ui/ui-events.html )
In Android Studio software, a layout with three buttons (White, Grey and Black) was created. The layout was given an ID as it will be called and defined within the main java file.
Here is my .xml layout file:
<LinearLayout xmlns:android="http://schemas.android.com/apk/res/android"
    android:id="@+id/background"
    android:orientation="vertical"
    android:layout_width="fill_parent"
    android:layout_height="fill_parent">
    android:paddingLeft="@dimen/activity_horizontal_margin"
    android:paddingRight="@dimen/activity_horizontal_margin"
    android:paddingTop="@dimen/activity_vertical_margin"
    android:paddingBottom="@dimen/activity_vertical_margin"
    tools:context="com.example.buttonchangecolour.app.LinearLayoutActivity">


    <Button
        style="?android:attr/buttonStyleSmall"
        android:layout_width="wrap_content"
        android:layout_height="wrap_content"
        android:text="Click for White"
        android:id="@+id/btnWhite"
        android:layout_gravity="center_horizontal" />

    <Button
        style="?android:attr/buttonStyleSmall"
        android:layout_width="wrap_content"
        android:layout_height="wrap_content"
        android:text="Click for Grey"
        android:id="@+id/btnGrey"
        android:layout_gravity="center_horizontal" />

    <Button
        style="?android:attr/buttonStyleSmall"
        android:layout_width="wrap_content"
        android:layout_height="wrap_content"
        android:text="Click for Black"
        android:id="@+id/btnBlack"
        android:layout_gravity="center_horizontal" />


</LinearLayout>
This produces the following layout:

Here is my .java file:
package com.example.buttonchangecolour.app;

import android.graphics.Color;
import android.os.Bundle;
import android.support.v7.app.ActionBarActivity;
import android.view.Menu;
import android.view.MenuItem;
import android.view.View;
import android.widget.Button;
import android.widget.LinearLayout;


public class LinearLayoutActivity extends ActionBarActivity {

    // define some variables
    LinearLayout background;
    Button btnWhite;
    Button btnGrey;
    Button btnBlack;


    @Override
    // setup an view with reference to the "linear_layout"
    protected void onCreate(Bundle savedInstanceState) {
        super.onCreate(savedInstanceState);
        setContentView(R.layout.linear_layout);

        // give variables a value //
        // set variable "background" as "linear_layout" and giving it the id previously setup
        background = (LinearLayout) findViewById(R.id.background);
        // reference our buttons with id's
        btnWhite = (Button) findViewById(R.id.btnWhite); //
        btnGrey = (Button) findViewById(R.id.btnGrey); //
        btnBlack = (Button) findViewById(R.id.btnBlack); //

        // set listener for when btnWhite is pressed
        btnWhite.setOnClickListener(new View.OnClickListener() {
            @Override
            public void onClick(View v) {
                // when clicked set background color to white
                background.setBackgroundColor(Color.parseColor("#FFFFFF"));
            }
        });
        // set listener does when btnGrey is pressed
        btnGrey.setOnClickListener(new View.OnClickListener() {
            @Override
            public void onClick(View v) {
                //
                background.setBackgroundColor(Color.parseColor("#666666"));
            }
        });
        /* Set listener does when btnBlack is pressed */
        btnBlack.setOnClickListener(new View.OnClickListener() {
            @Override
            public void onClick(View v) {
                //
                background.setBackgroundColor(Color.parseColor("#000000"));
            }
        });


    }


    @Override
    public boolean onCreateOptionsMenu(Menu menu) {

        // Inflate the menu; this adds items to the action bar if it is present.
        getMenuInflater().inflate(R.menu.linear_layout, menu);
        return true;
    }

    @Override
    public boolean onOptionsItemSelected(MenuItem item) {
        // Handle action bar item clicks here. The action bar will
        // automatically handle clicks on the Home/Up button, so long
        // as you specify a parent activity in AndroidManifest.xml.
        int id = item.getItemId();
        if (id == R.id.action_settings) {
            return true;
        }
        return super.onOptionsItemSelected(item);
    }
Here is a video of it working:
Next stage: GPS
Getting the current GPS Location
To access the GPS location provider in the application, “Google Play Services SDK” in Android Studio was installed. A “Uses permission” must also be added to access the fine location of the device – this was achieved by adding the following to the AndroidManifest.xml file:
The layout of the application was then set up with one button and one textview. When the button is pushed, the GSP location service will be called and then the location will be displayed in the Textview. Android developer guide to using location services: (http://developer.android.com/guide/topics/location/strategies.html)
I created a layout .xml file with a button: Get Location to get the GPS coordinates.
A Text Label: location Label, to display the GSP coordinates.
Here is the .xml file:
<LinearLayout xmlns:android="http://schemas.android.com/apk/res/android"
    android:layout_width="fill_parent"
    android:layout_height="fill_parent"
    android:orientation="vertical" >

    <Button android:id="@+id/getLocation"
        android:layout_width="fill_parent"
        android:layout_height="wrap_content"
        android:text="@string/get_location"/>


    <TextView
        android:id="@+id/locationLabel"
        android:layout_width="wrap_content"
        android:layout_height="wrap_content"/>


</LinearLayout>
This produces the following layout:


Here is the java file:
package com.example.gpsdisplay.app;

import android.location.Location;
import android.os.Bundle;
import android.support.v4.app.FragmentActivity;
import android.view.View;
import android.widget.Button;
import android.widget.TextView;

import com.google.android.gms.common.ConnectionResult;
import com.google.android.gms.common.GooglePlayServicesClient;
import com.google.android.gms.location.LocationClient;

public class MainActivity extends FragmentActivity implements
        GooglePlayServicesClient.ConnectionCallbacks,
       GooglePlayServicesClient.OnConnectionFailedListener {
    LocationClient mLocationClient;

    // Declare some variables
    private TextView locationLabel;
    private Button getLocationBtn;

    @Override
    protected void onCreate(Bundle savedInstanceState) {
        super.onCreate(savedInstanceState);
        setContentView(R.layout.activity_main);

        // Define variables
        locationLabel = (TextView) findViewById(R.id.locationLabel);
        getLocationBtn = (Button) findViewById(R.id.getLocation);

        getLocationBtn.setOnClickListener(new View.OnClickListener() {
            public void onClick(View view) {
                displayCurrentLocation();
            }
        });

        // Create the LocationRequest object
        mLocationClient = new LocationClient(this, this, this);
    }

    @Override
    protected void onStart() {
        super.onStart();
        // Connect the client.
        mLocationClient.connect();
    }

    @Override
    protected void onStop() {
        // Disconnect the client.
        mLocationClient.disconnect();
        super.onStop();
    }

    @Override
    public void onConnected(Bundle dataBundle) {
    }


    @Override
    public void onDisconnected() {
    }

    @Override
    public void onConnectionFailed(ConnectionResult connectionResult) {
    }

    public void displayCurrentLocation() {
        // Get the current location's latitude & longitude
        Location currentLocation = mLocationClient.getLastLocation();
        String msg = "Current Location: " +
                Double.toString(currentLocation.getLatitude()) + "," +
                Double.toString(currentLocation.getLongitude());

        // Display current location
        locationLabel.setText(msg);

    }
}
Here is a video of it in action:
Construction Time:
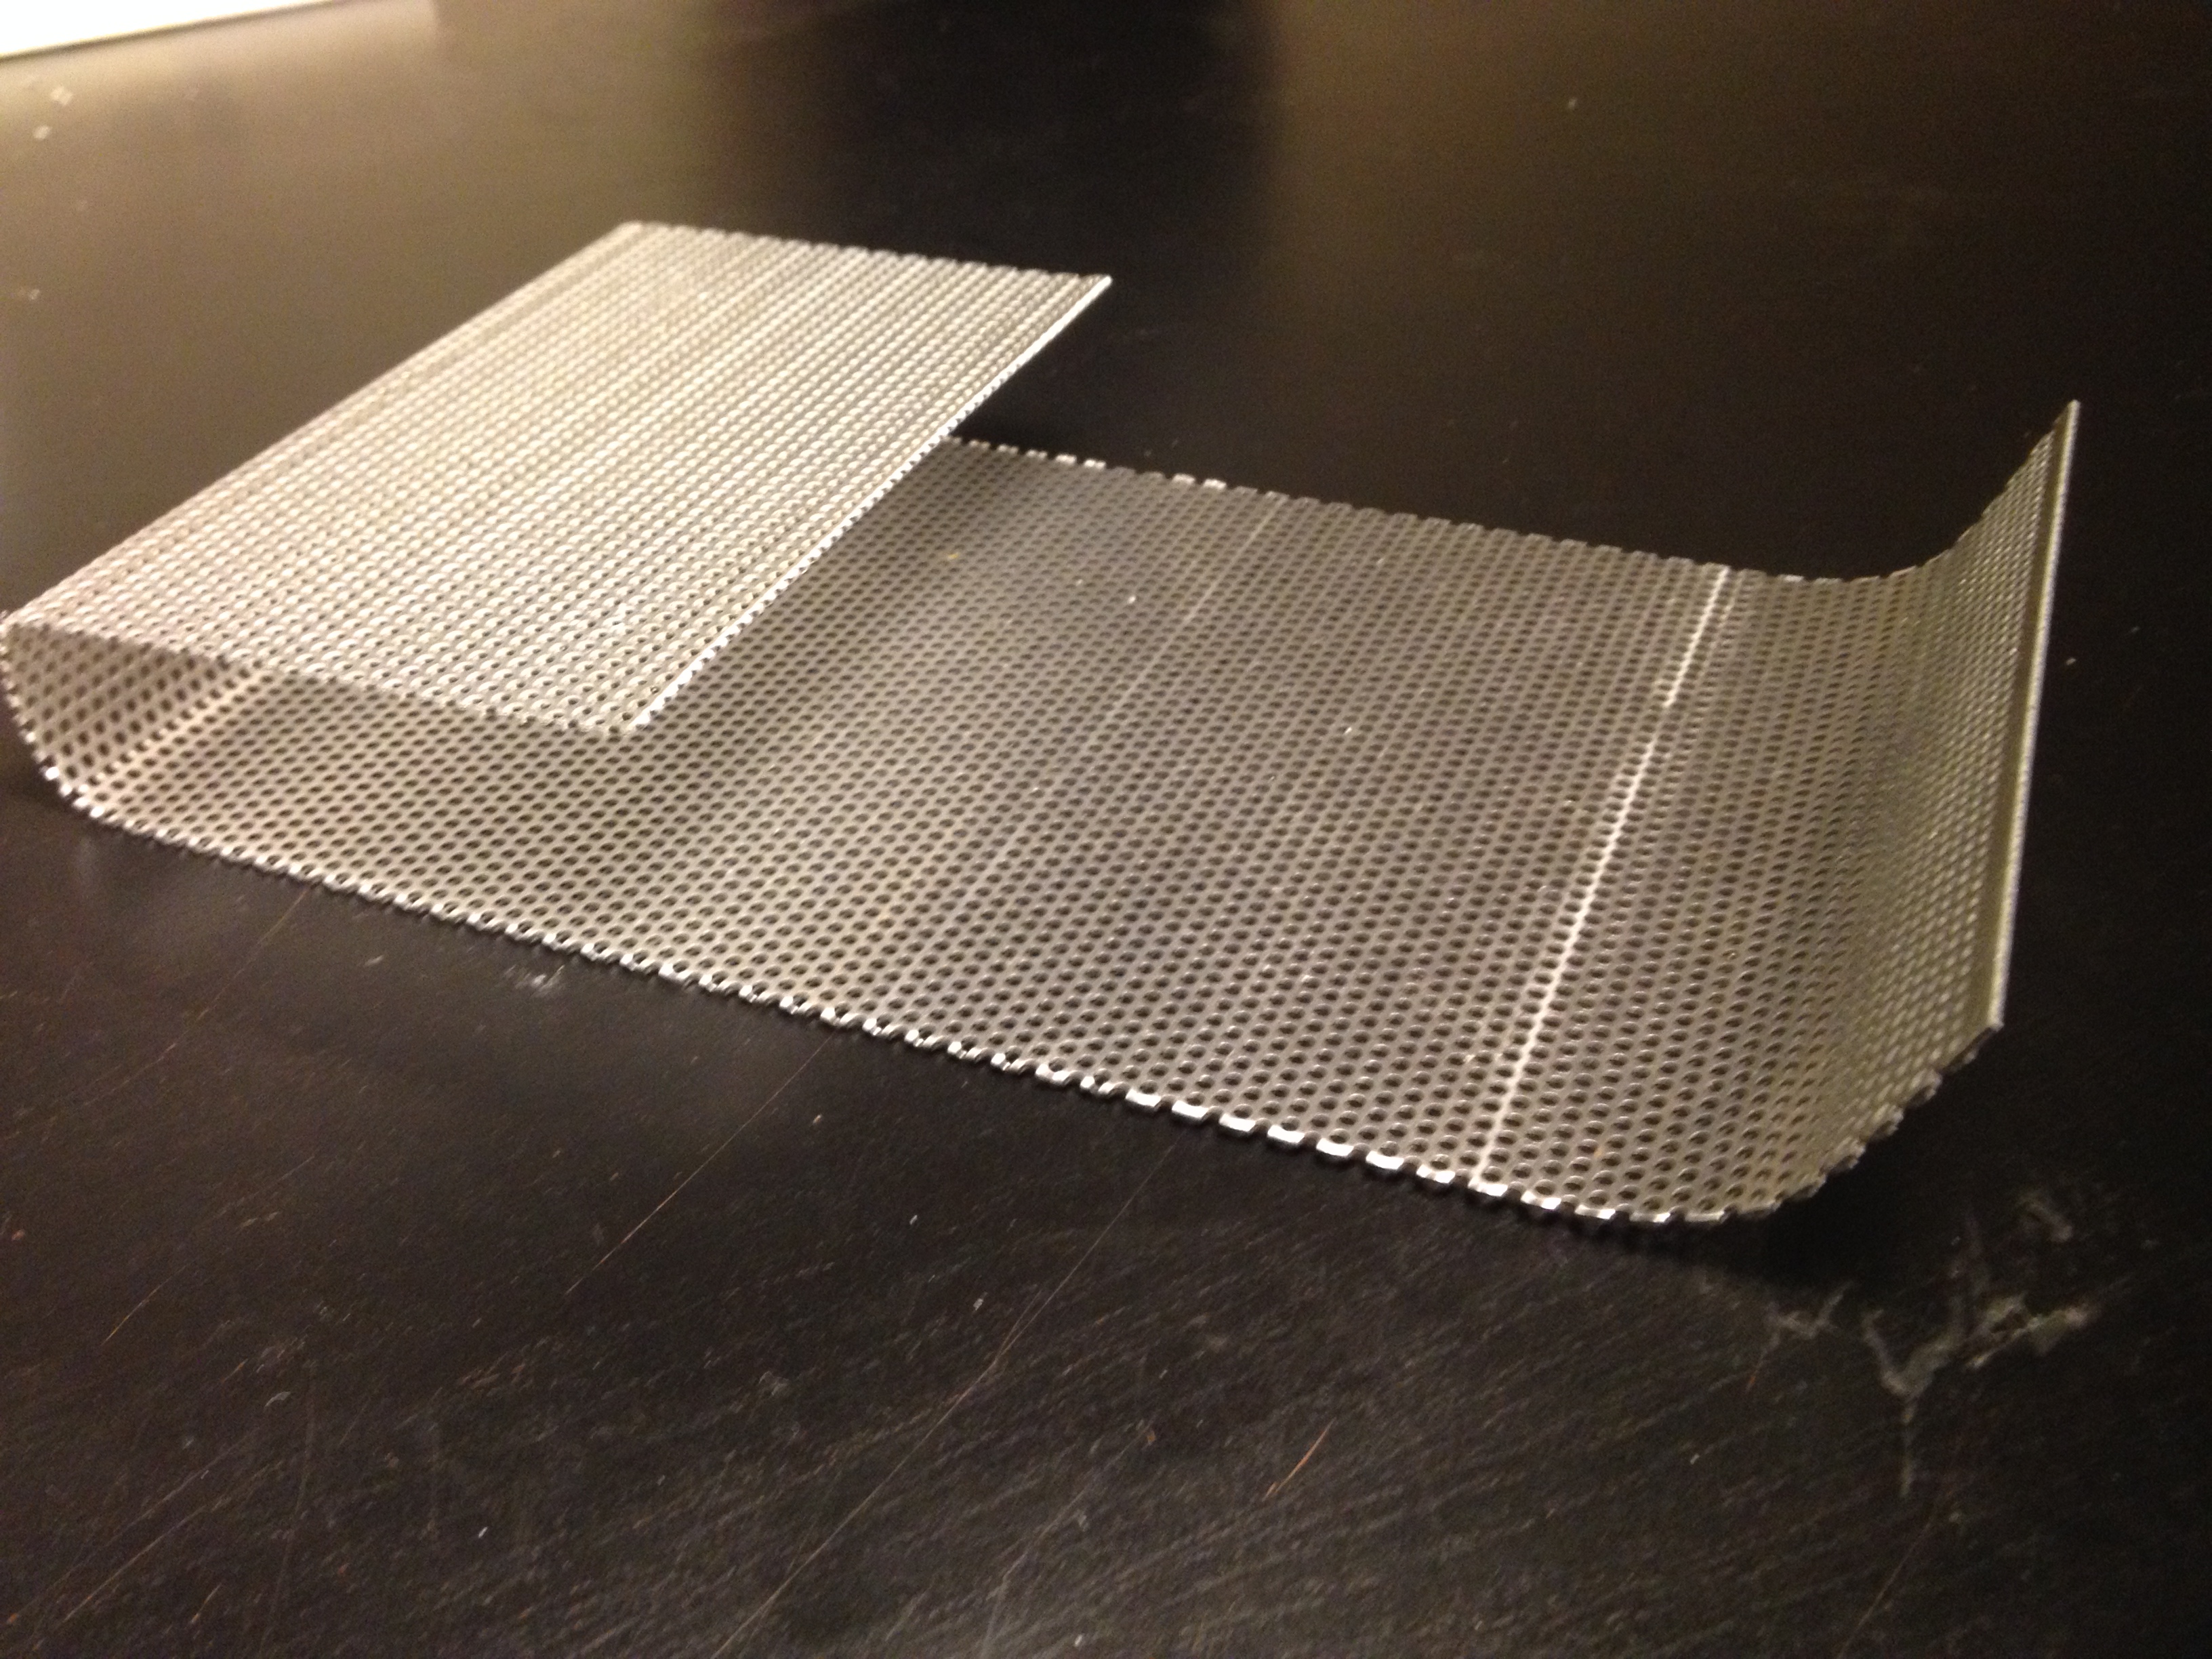
For the frame I cut a piece of perforated steel sheeting and it into shape like this:

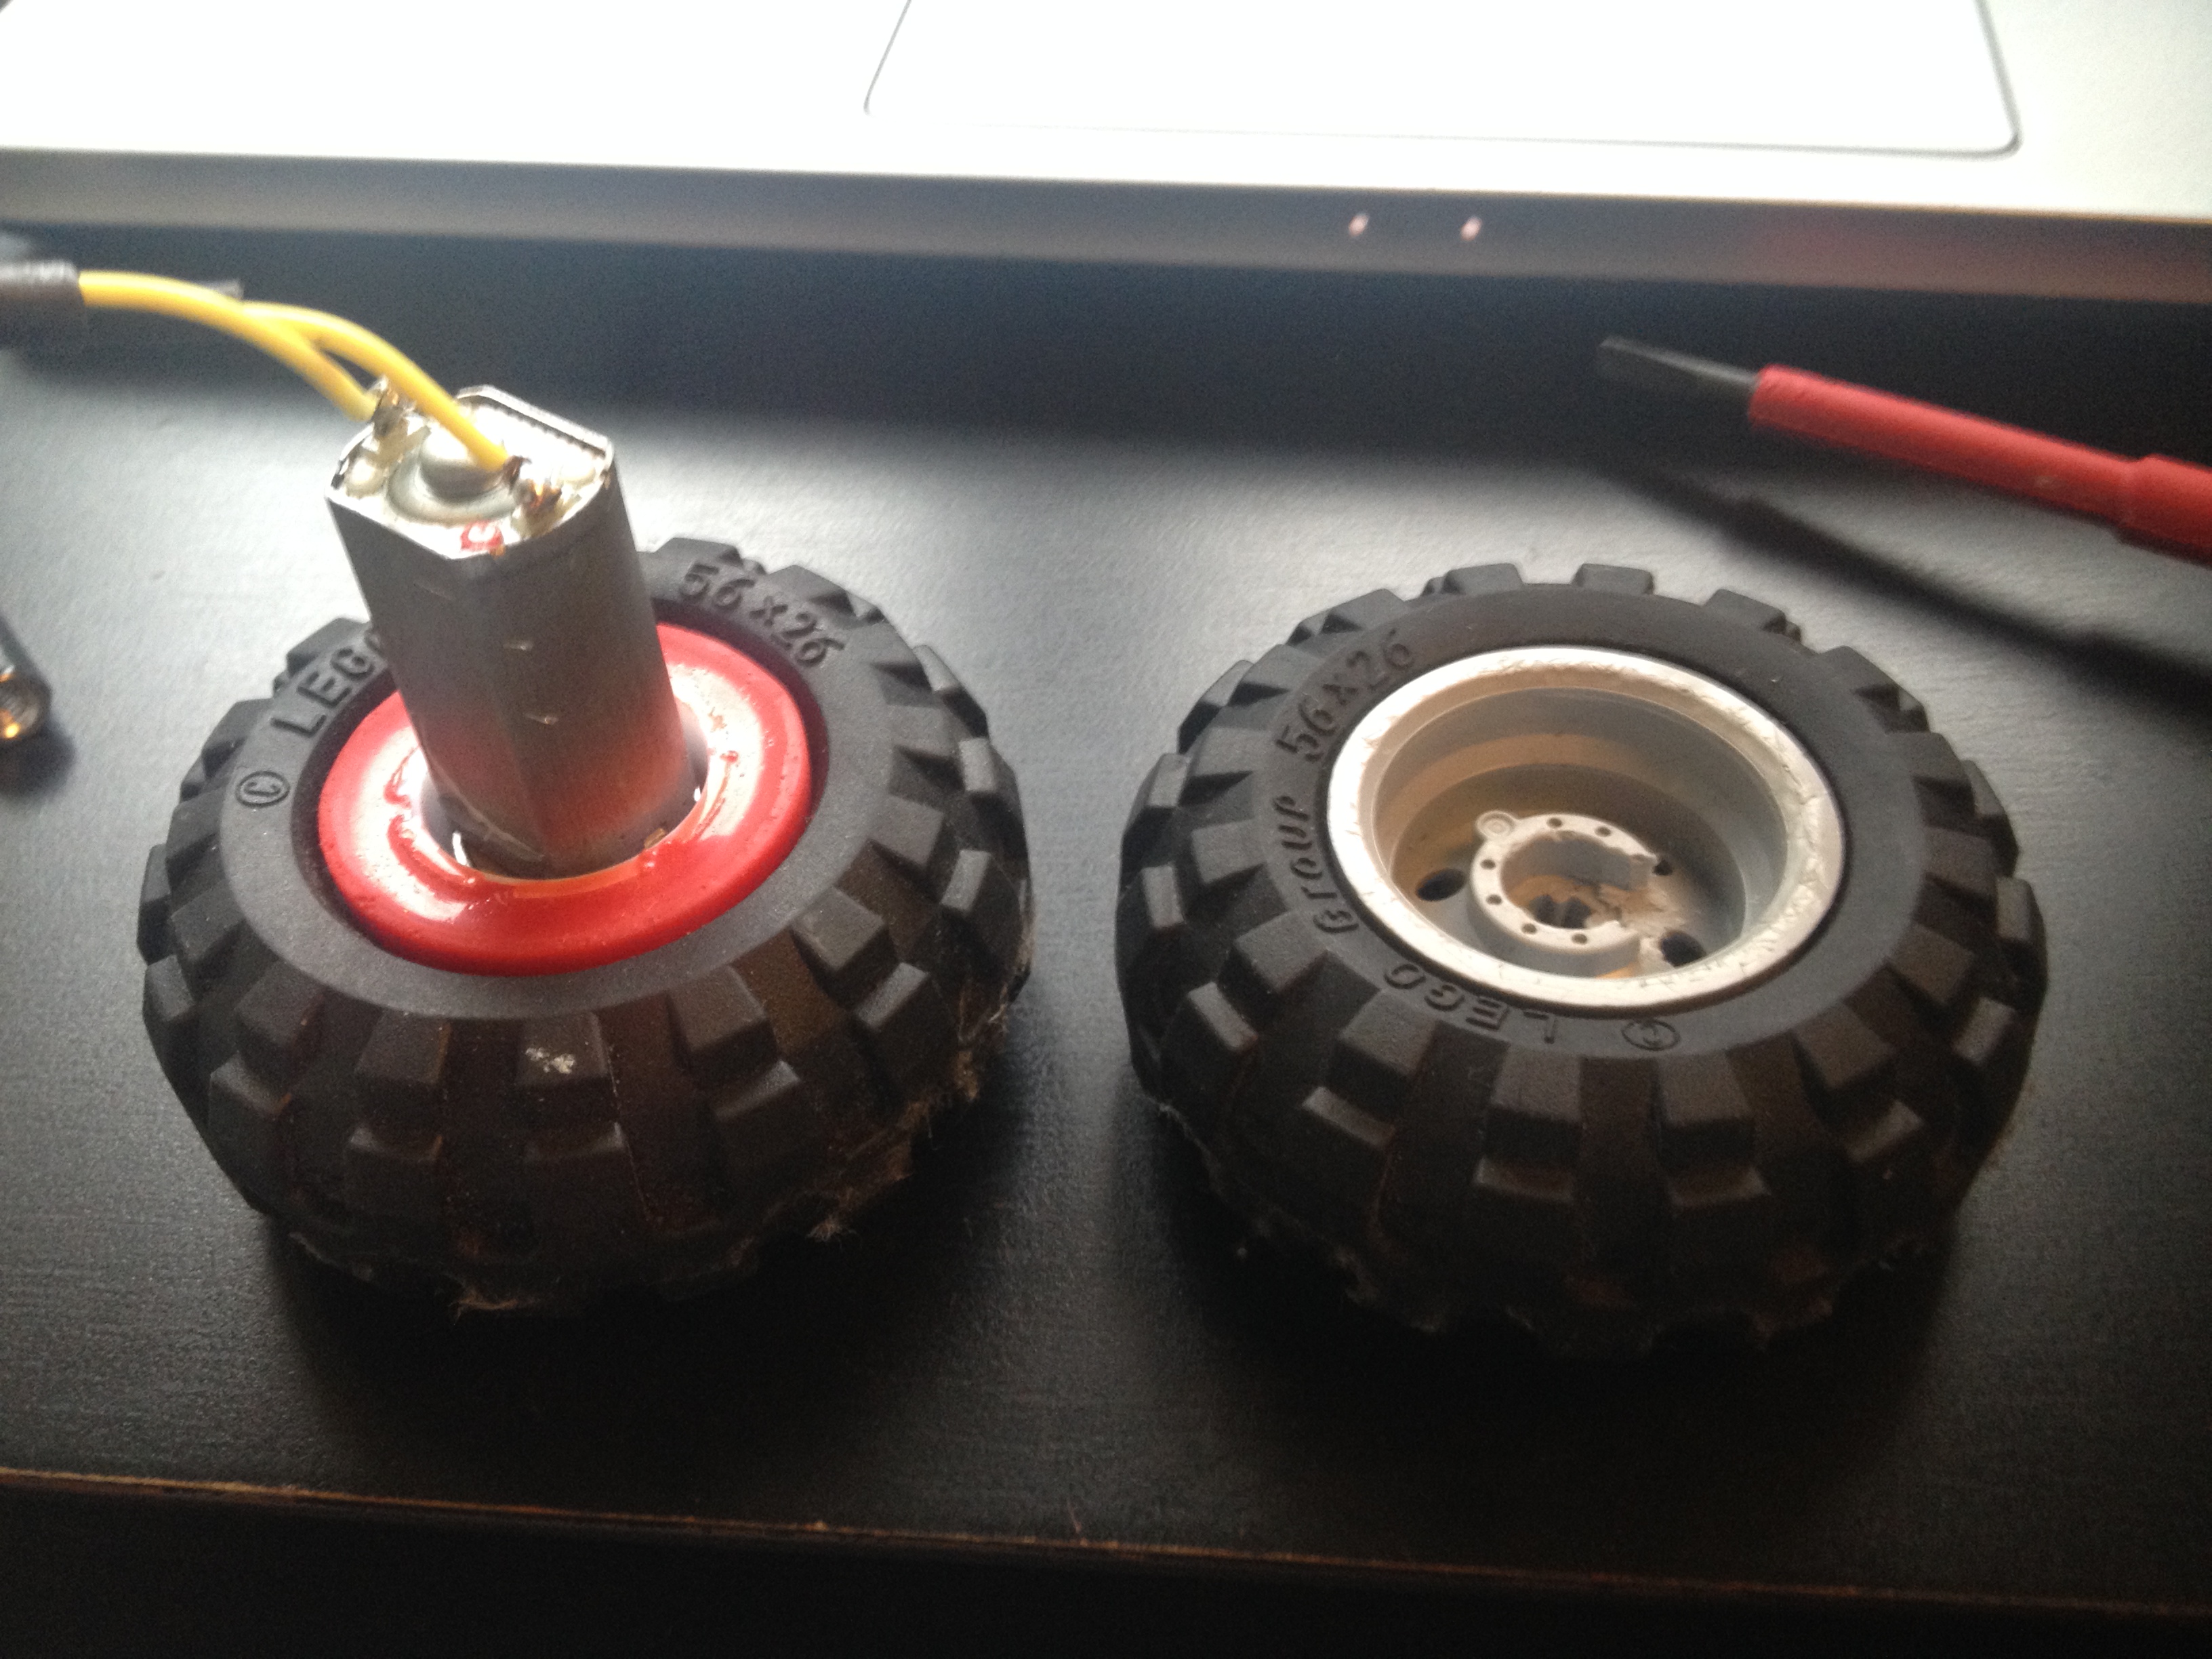
I then found rubber tires that fitted over my robosumo motors so that the robot could drive on rougher terrain:

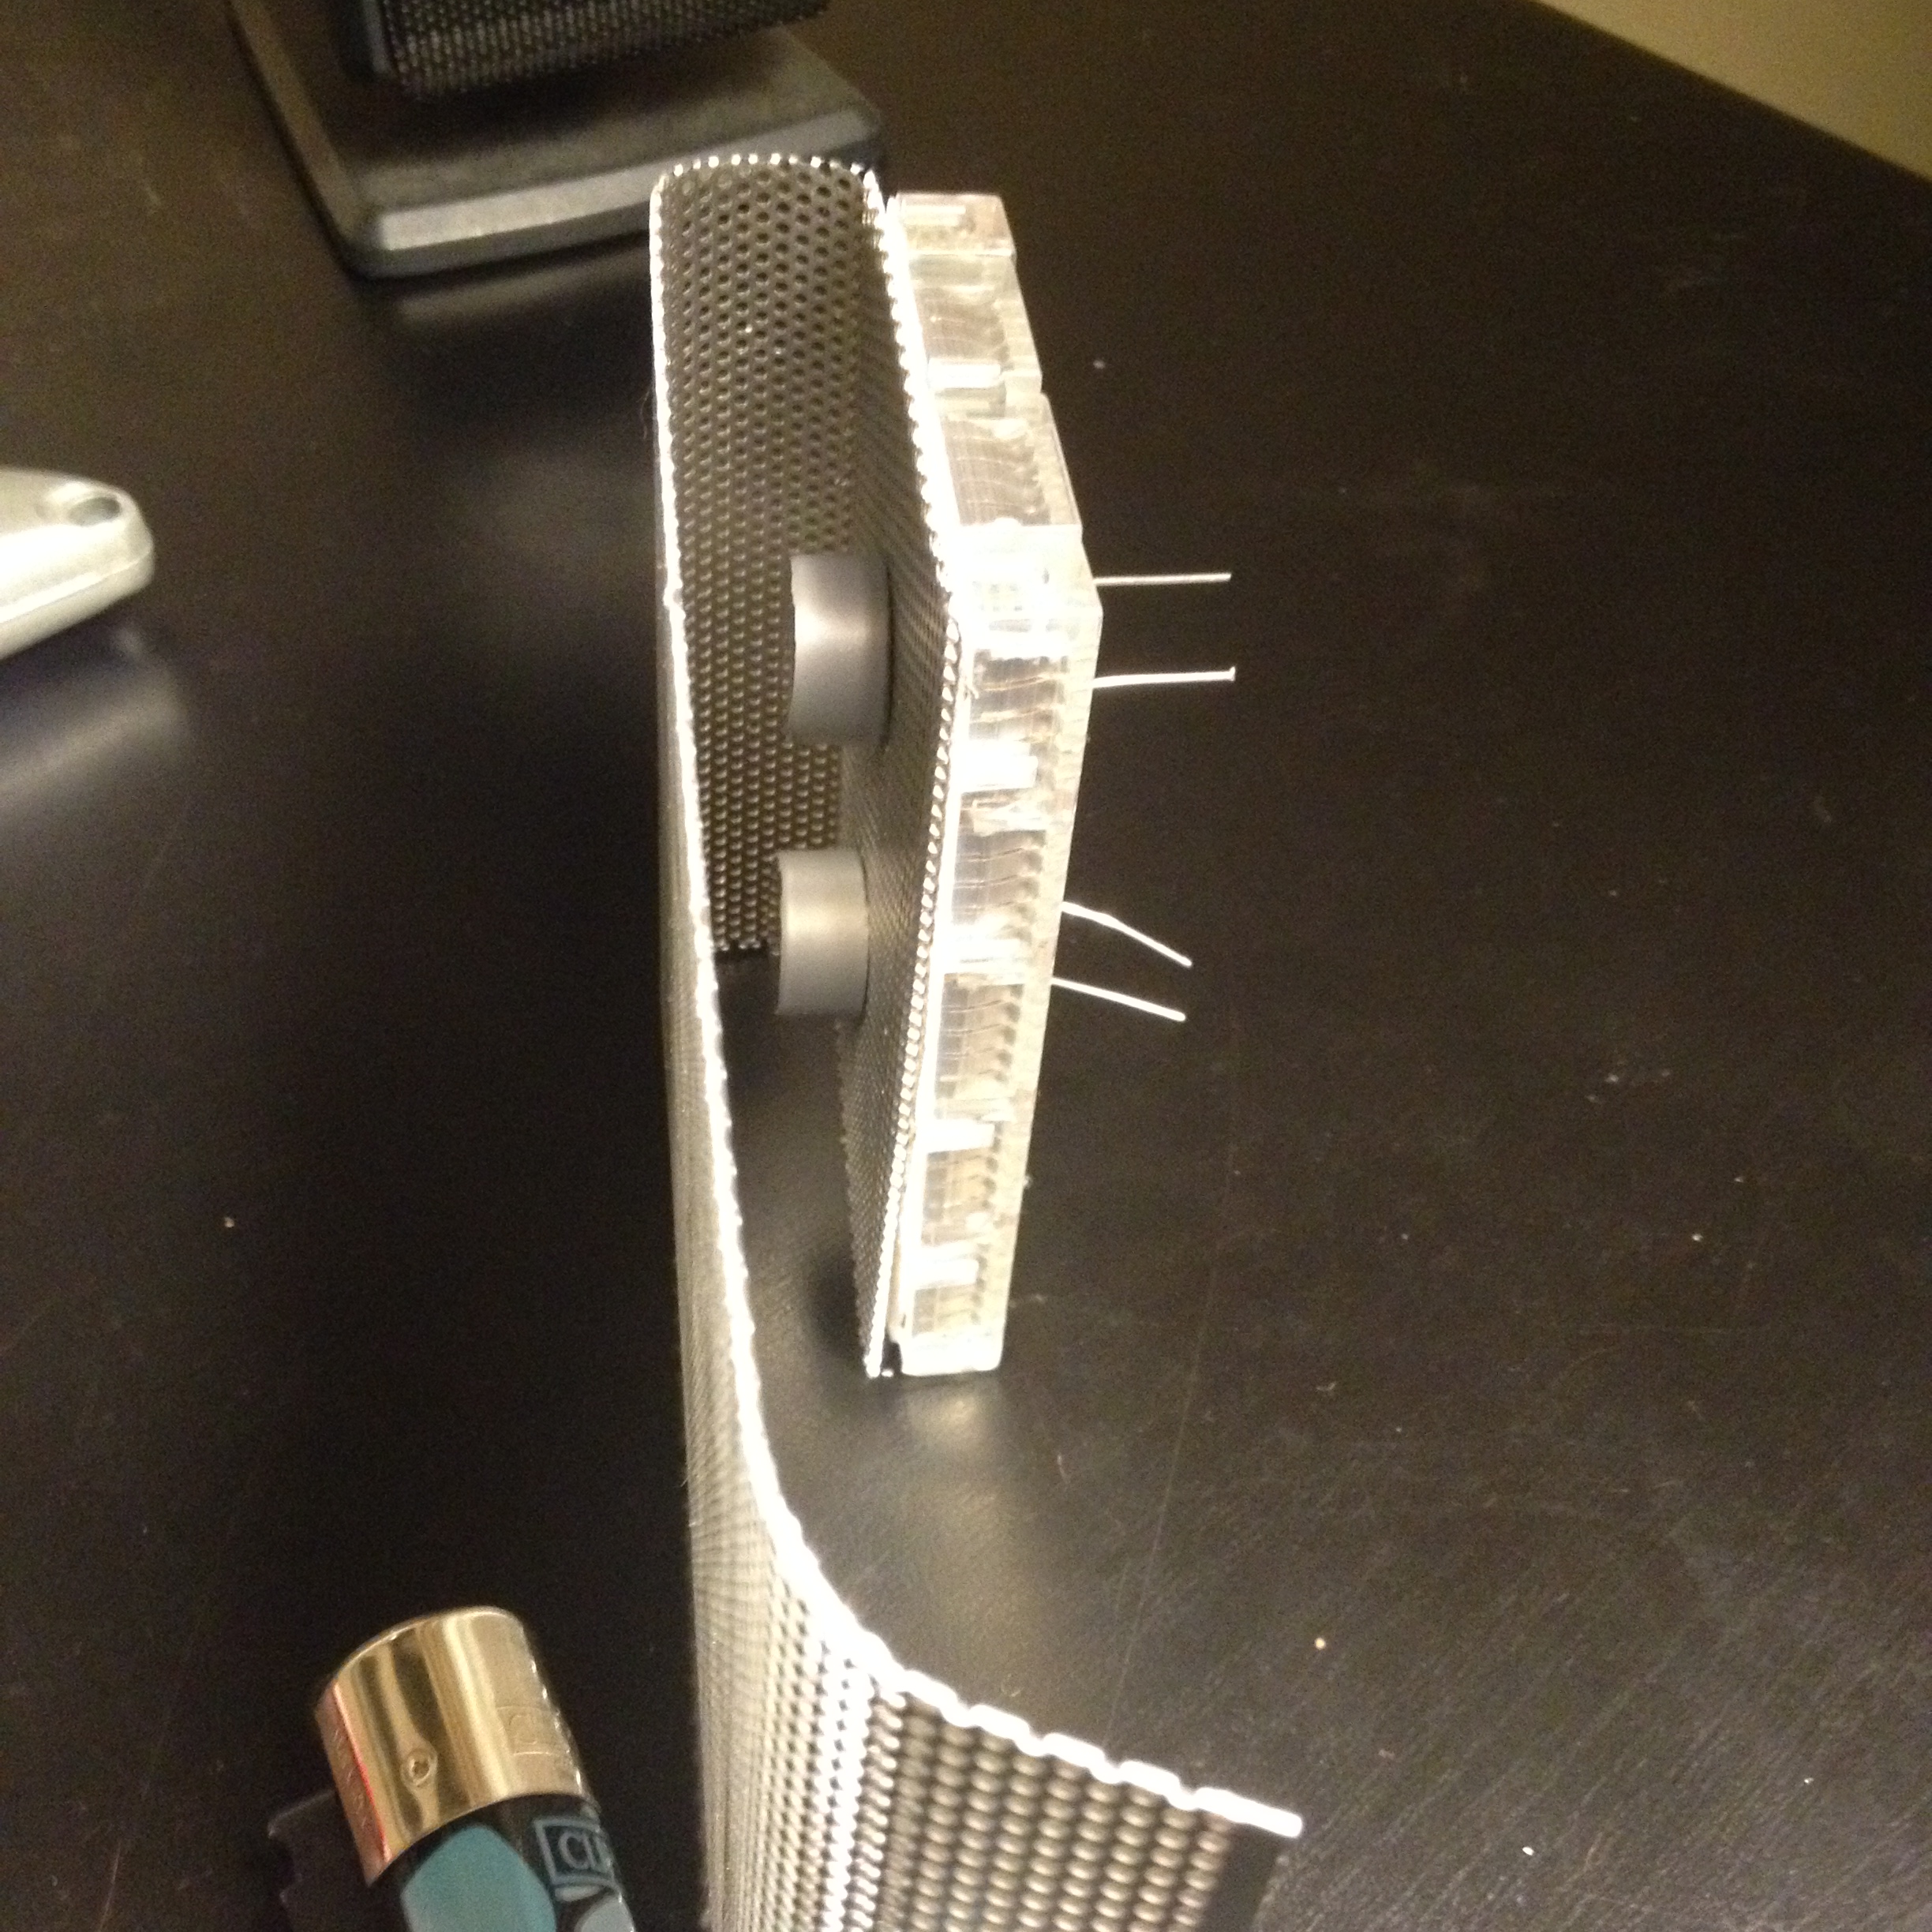
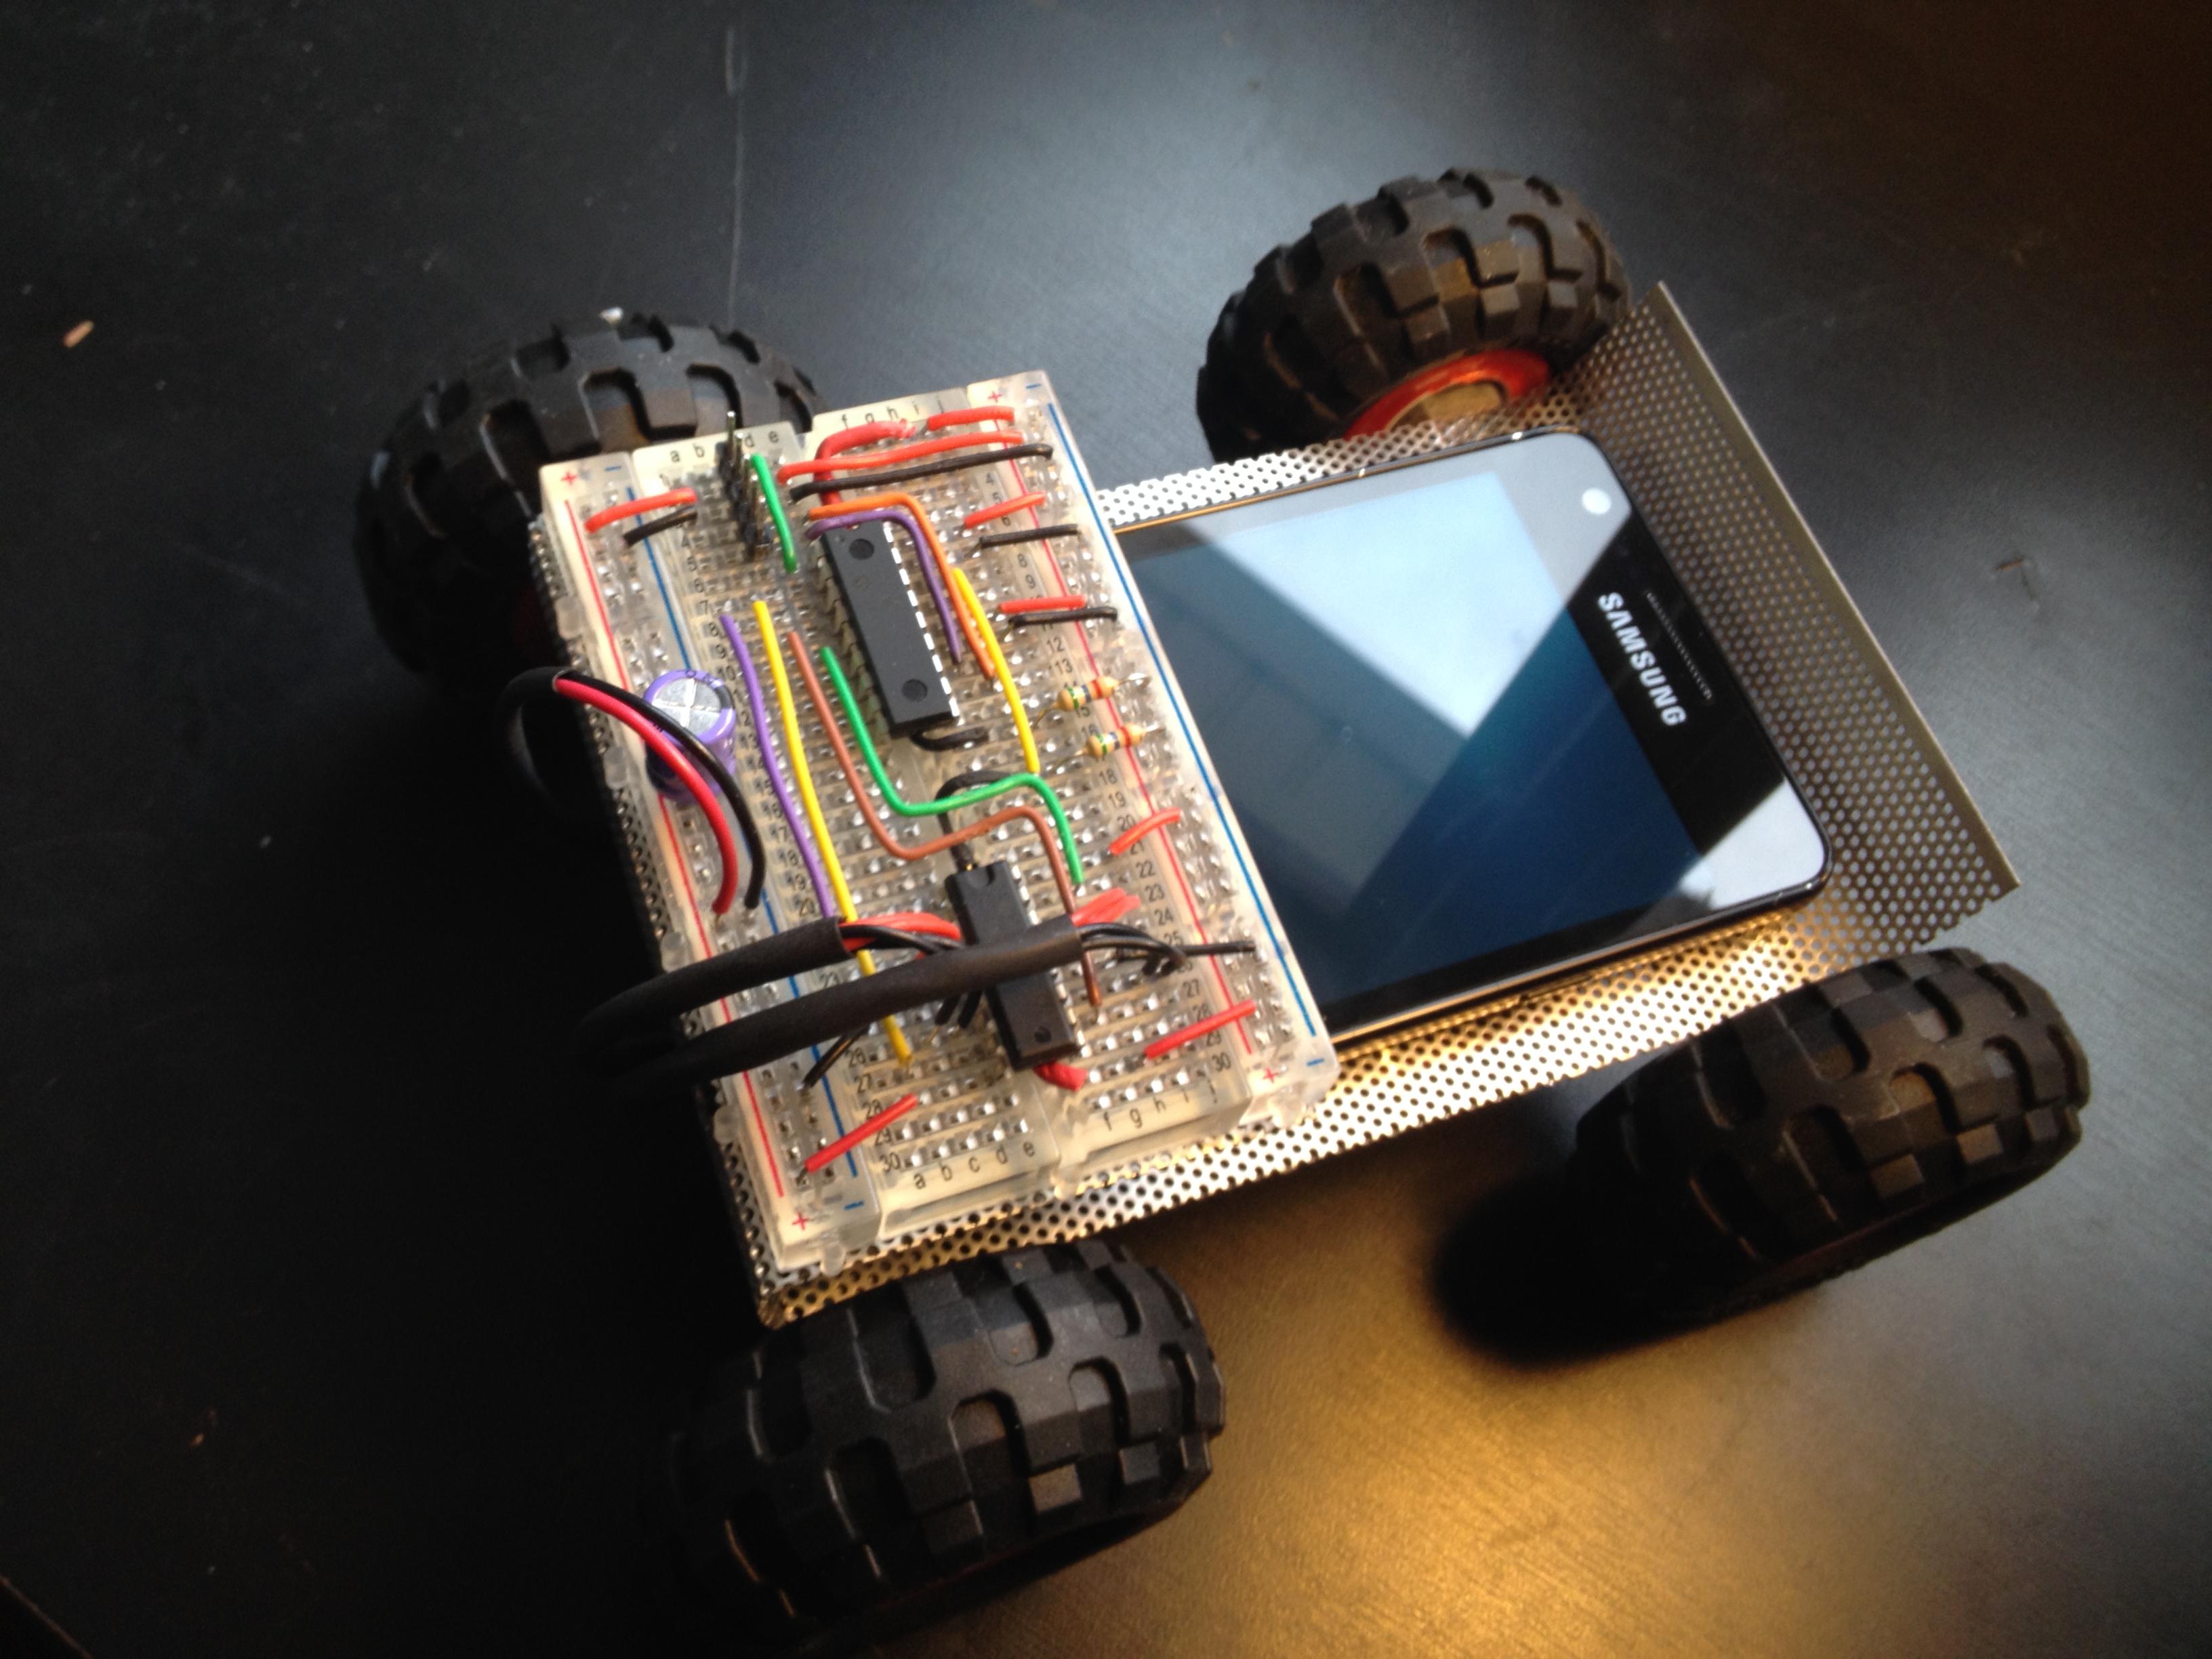
I then used two LRD’s (Light dependent resistors) and wrapped insulating tape around the edges to try block as much light as possible from the sun so that the only light getting to the LDR’s is from the phone screen. Here’s some photos of them:

On my breadboard I drilled 4 holes to insert the legs of the LDR’s through:

With the phone in place you can see the the LDR’s flush with the screen:

I then stuck the wheels and my battery pack (4xAA) to the bottom of the frame:

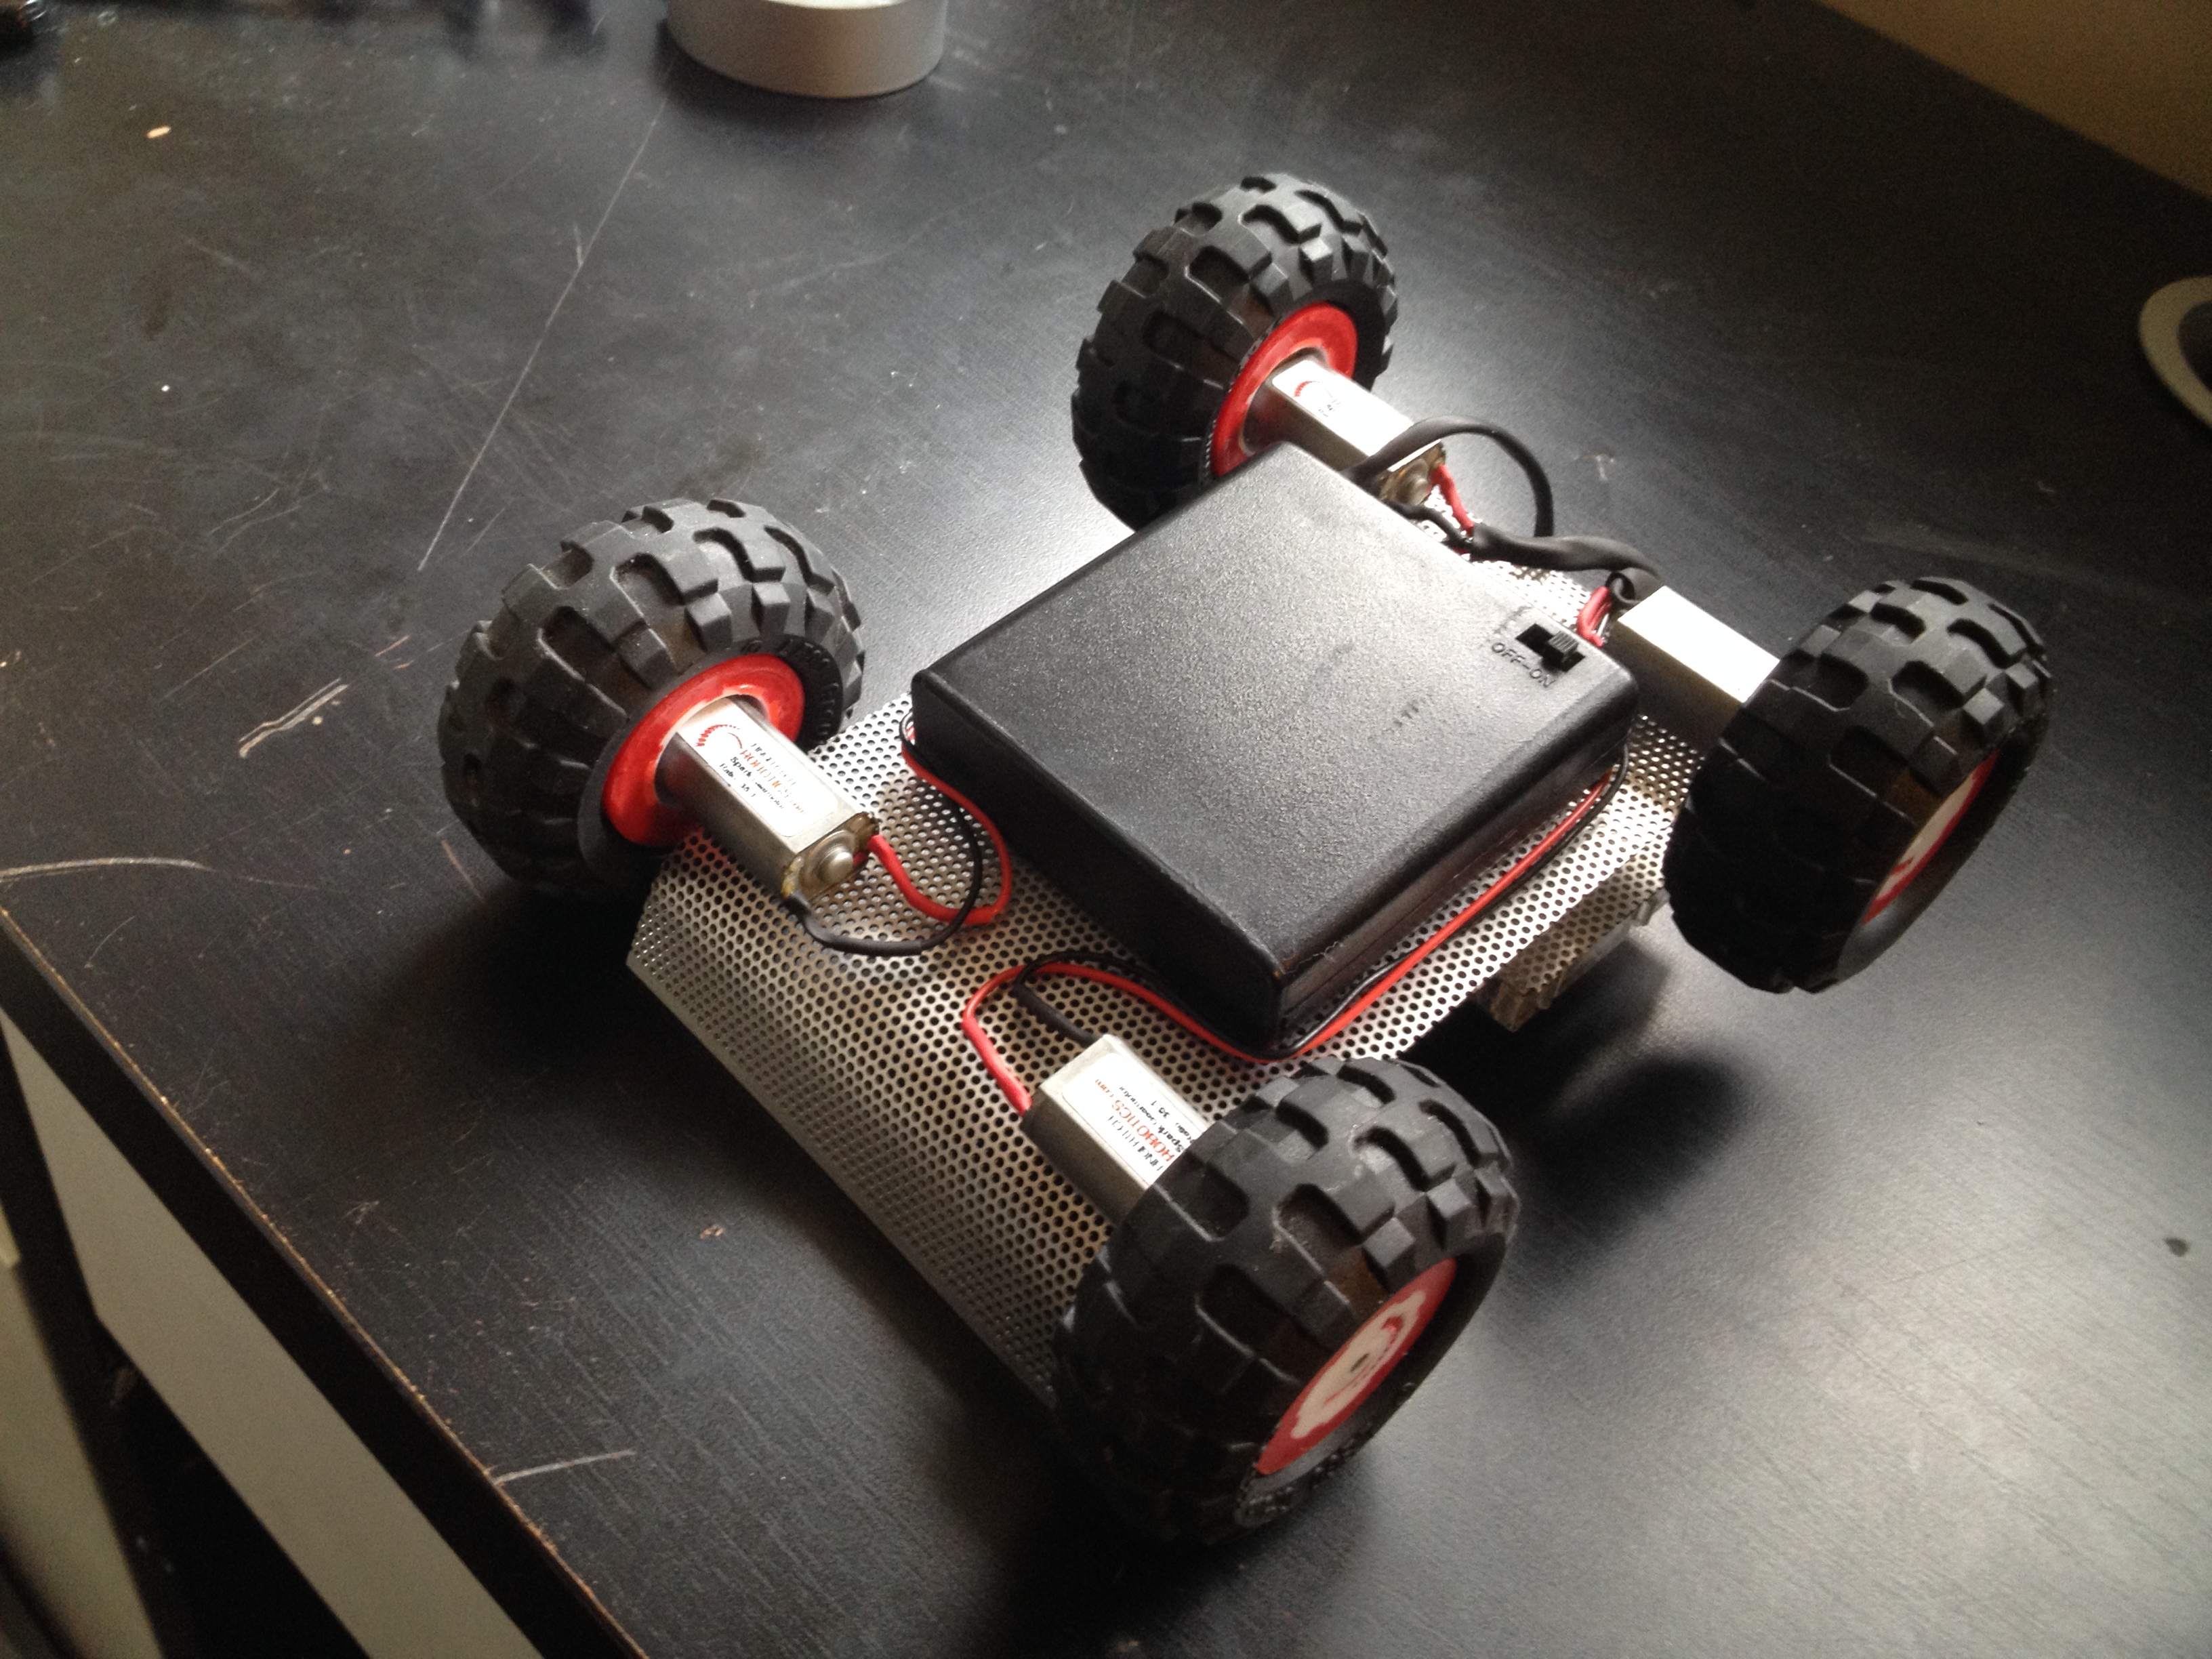
Then connect the motors and battery pack to the circuit:
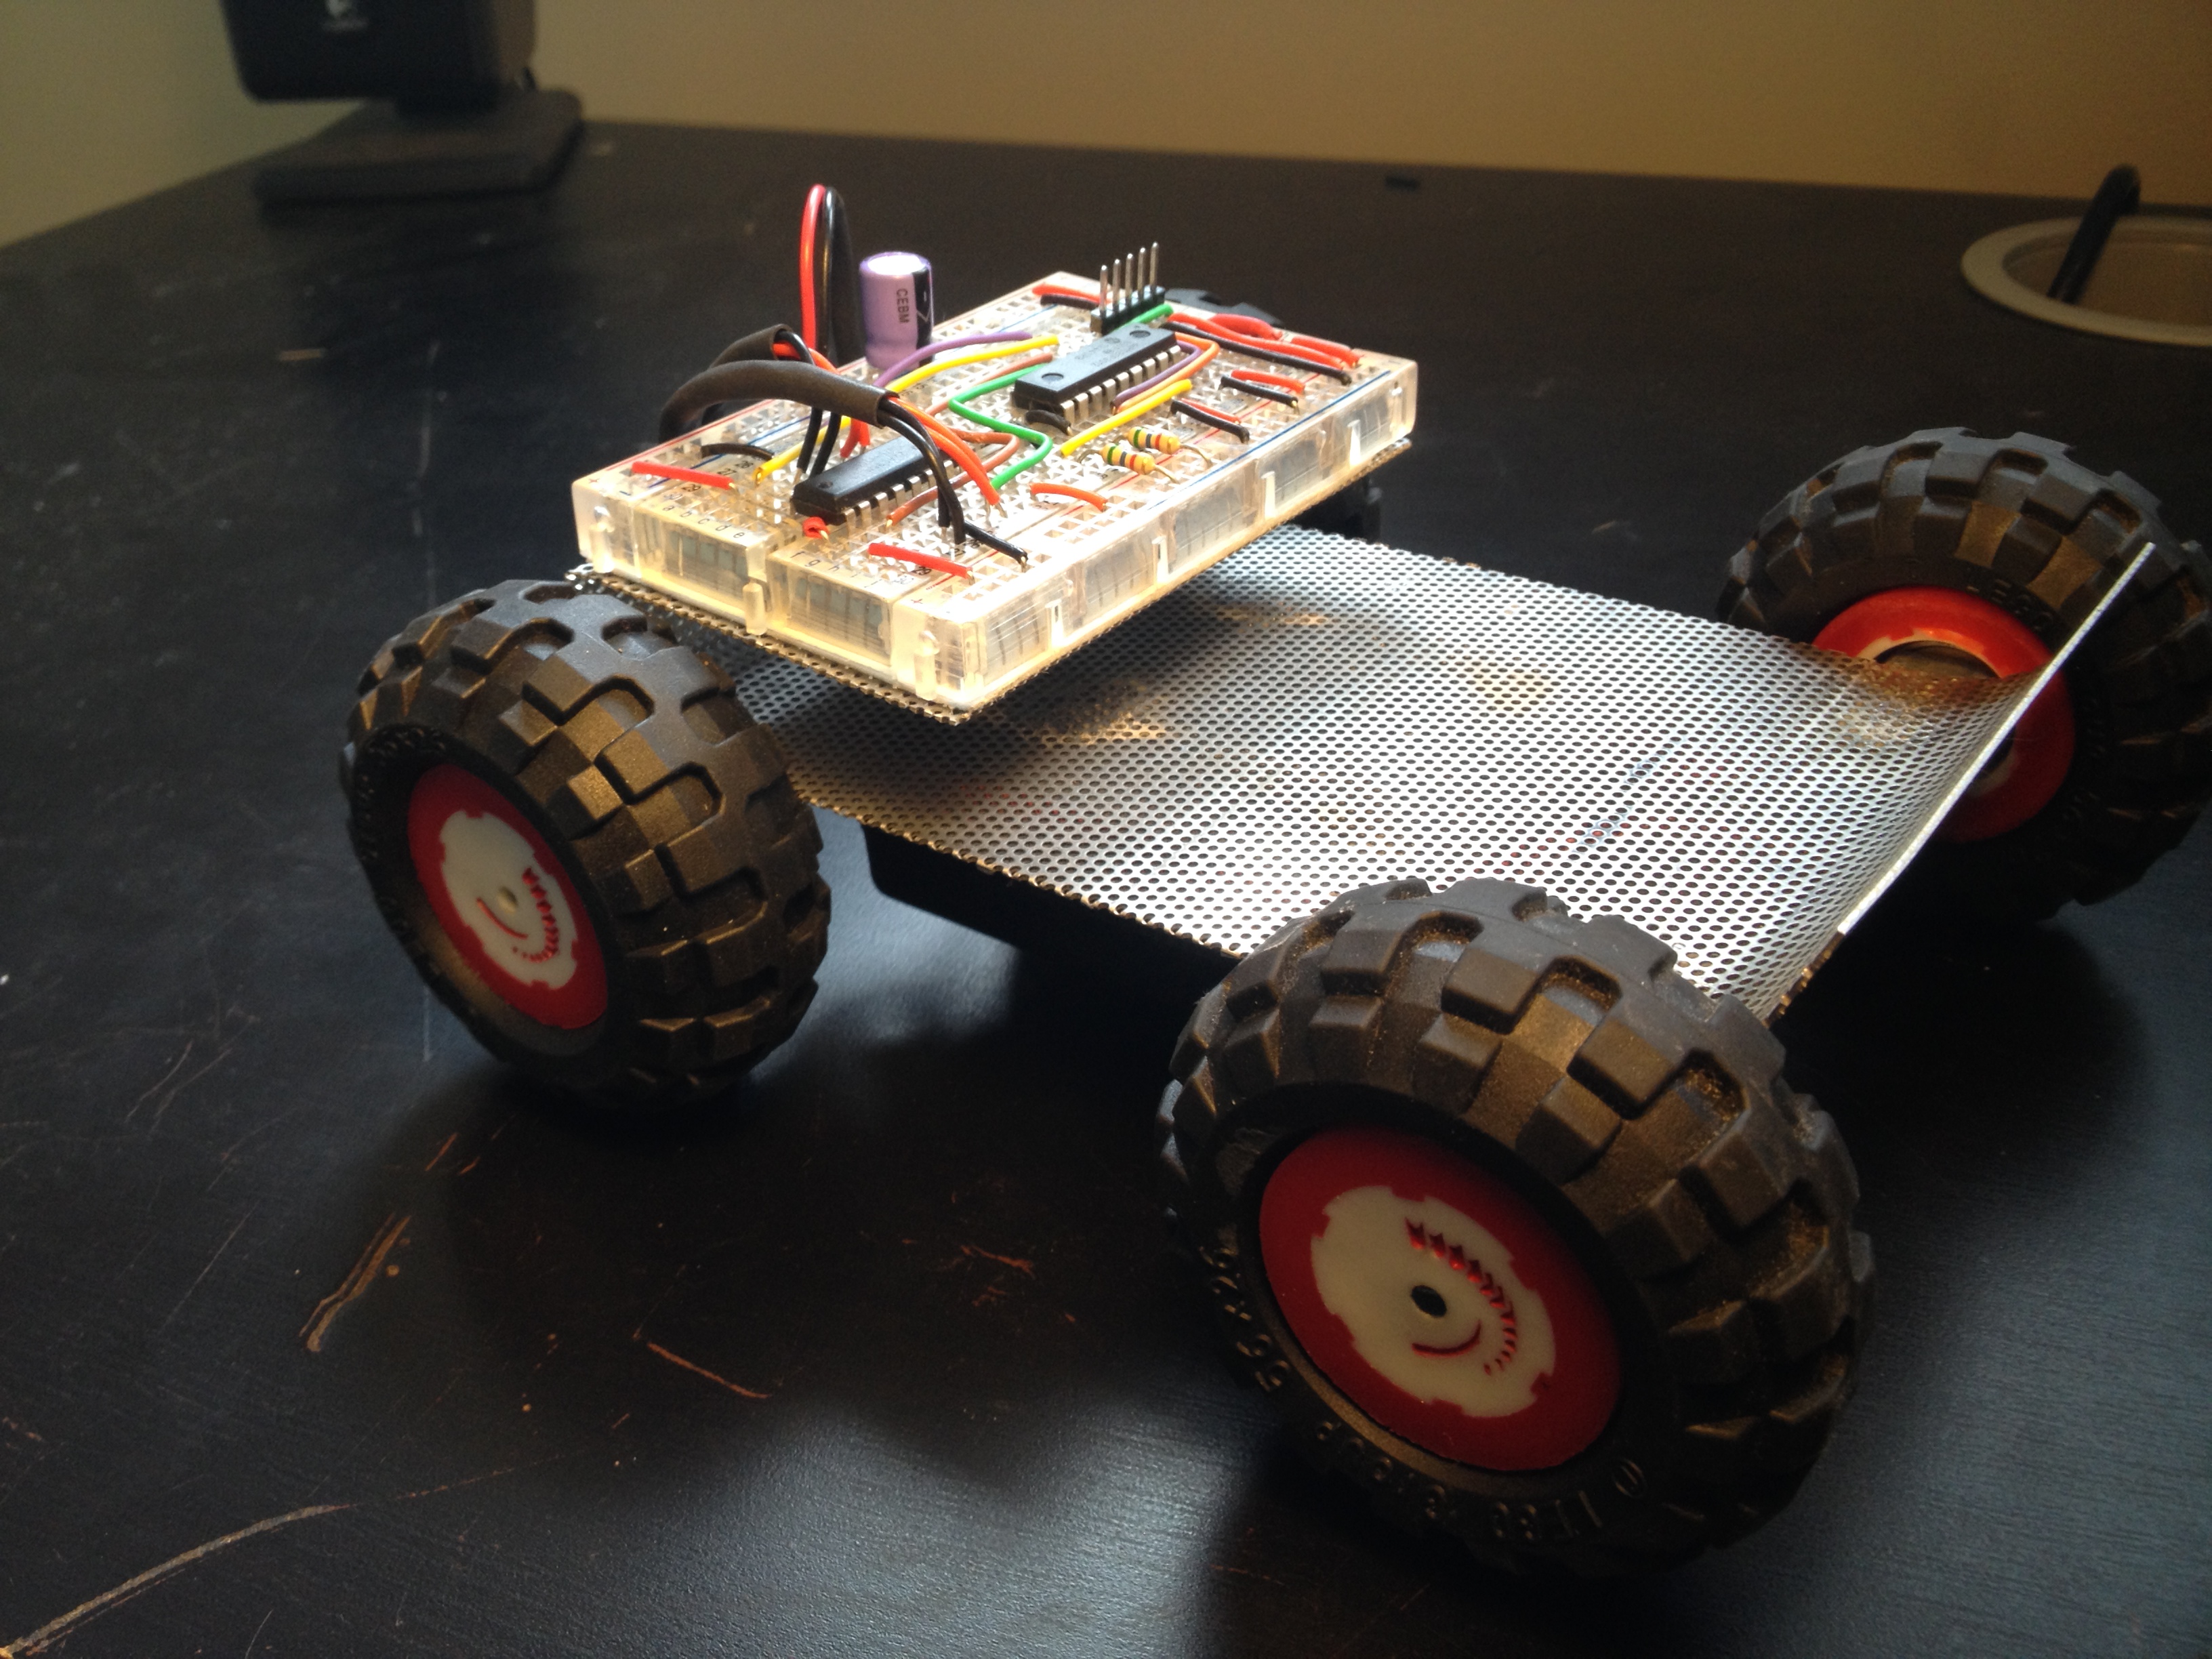

And finally slot the phone in:

I then needed to test the digital values of the LDR’s with different shades of grey on the screen.
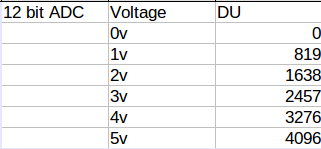
The chip im using is a dsPIC30F3012 which has a 12 BIT ADC and my analogue reference voltage is 5V, therefor:
To then had to choose a resistor to go in series with the LDR (creating a voltage divider) to give me the biggest swing in voltage.
There is a simple formula for this: R = sqrt(Rmin x Rmax)
With my Galaxy S2 the resistance values of the LDR were as follows:
Bright (White) screen = 1.3K Ohms
Dark (Black) screen = 30K Ohms
Therefor when I use the formula the value of the series resistor I should use is 6244 Ohms.
5600 Ohms was the closest resistor value I had on hand. So with my LDR and resistor wired in series I had my simple voltage divider ready for testing. I then wrote a C program and a python script to read and print the colour values of the screen.
Here is my C file:
// Author: Aron Horan
// Date: 6 Mar 2014
// Read & display analog values
// dsPIC30F3012

#include <xc.h>
#include <libpic30.h>
#include <stdio.h>

// Configuration settings
_FOSC(CSW_FSCM_OFF & FRC_PLL16); // Fosc=16x7.5MHz, Fcy=30MHz
_FWDT(WDT_OFF);                  // Watchdog timer off
_FBORPOR(MCLR_DIS);              // Disable reset pin

// Function prototypes
unsigned int read_analog_channel(int);

int main()
{
	int eye;

	// Configure UART
	U1BRG = 48;            // 38400 baud @ 30 MIPS
	U1MODEbits.UARTEN = 1; // Enable UART


	 //configure digital io
	 TRISB = 0b1111111111110000;

	// Configure analog inputs
	ADPCFG = 0b1111111100111111;// Only AN6 and AN7 are analog inputs
	ADCON1 = 0;                 // Manually clear SAMP to end sampling, start conversion
	ADCON2 = 0;                 // Voltage reference from AVDD and AVSS
	ADCON3 = 19;            	// Manual Sample, ADCS=9 -> Tad = 10*Tcy = 333ns
	ADCON1bits.ADON = 1;        // Turn ADC ON


	while(1)
	{
		eye = read_analog_channel(6); 	// read sensor
		printf("%d\n ",eye); 			// print values
		__delay32(150000); 				// small delay
	}
	return 0;
}

unsigned int read_analog_channel(int channel)
{
	ADCHS = channel;          	// Select the requested channel
	ADCON1bits.SAMP = 1;      	// start sampling
	__delay32(30);            	// 1us delay @ 30 MIPS
	ADCON1bits.SAMP = 0;      	// start Converting
	while (!ADCON1bits.DONE);	// Should take 12 * Tad = 1.2us
	return ADCBUF0;
}
Here is my python script:
import time
import serial

ser = serial.Serial(
    port='/dev/ttyUSB0',
    baudrate=38400,

    stopbits=serial.STOPBITS_ONE,
    bytesize=serial.SEVENBITS
)

ser.close()
ser.open()

while True:
	print(ser.readline())
The digital values were as follows:

With my digital colour values measured I went ahead and wrote the C program and an Android app to control the motor circuit.
The four different states of the machine will be:

Here is the layout xml file:
<LinearLayout xmlns:android="http://schemas.android.com/apk/res/android"
    android:id="@+id/background"
    android:orientation="vertical"
    android:layout_width="fill_parent"
    android:layout_height="fill_parent">
    android:paddingLeft="@dimen/activity_horizontal_margin"
    android:paddingRight="@dimen/activity_horizontal_margin"
    android:paddingTop="@dimen/activity_vertical_margin"
    android:paddingBottom="@dimen/activity_vertical_margin"
    tools:context="com.example.buttonchangecolour.app.LinearLayoutActivity">


    <Button
        style="?android:attr/buttonStyleSmall"
        android:layout_width="wrap_content"
        android:layout_height="wrap_content"
        android:text="Forwards"
        android:id="@+id/btnWhite"
        android:layout_gravity="center_horizontal" />

    <Button
        style="?android:attr/buttonStyleSmall"
        android:layout_width="wrap_content"
        android:layout_height="wrap_content"
        android:text="Turn Left"
        android:id="@+id/btnLiteGrey"
        android:layout_gravity="center_horizontal" />

    <Button
        style="?android:attr/buttonStyleSmall"
        android:layout_width="wrap_content"
        android:layout_height="wrap_content"
        android:text="Turn Right"
        android:id="@+id/btnGrey"
        android:layout_gravity="center_horizontal" />

    <Button
        style="?android:attr/buttonStyleSmall"
        android:layout_width="wrap_content"
        android:layout_height="wrap_content"
        android:text="Stop"
        android:id="@+id/btnBlack"
        android:layout_gravity="center_horizontal" />


</LinearLayout>
This produces a layout like this:

Here is my java file:
package com.example.buttonchangecolour.app;

import android.graphics.Color;
import android.os.Bundle;
import android.support.v7.app.ActionBarActivity;
import android.view.Menu;
import android.view.MenuItem;
import android.view.View;
import android.widget.Button;
import android.widget.LinearLayout;


public class LinearLayoutActivity extends ActionBarActivity {

    // define some variables
    LinearLayout background;
    Button btnWhite;
    Button btnlitegrey;
    Button btnGrey;
    Button btnBlack;


    @Override
    // setup an view with reference to the "linear_layout"
    protected void onCreate(Bundle savedInstanceState) {
        super.onCreate(savedInstanceState);
        setContentView(R.layout.linear_layout);

        // give variables a value //
        // set variable "background" as "linear_layout" and giving it the id previously setup
        background = (LinearLayout) findViewById(R.id.background);

        // reference our buttons with id's
        btnWhite = (Button) findViewById(R.id.btnWhite); //
        btnlitegrey = (Button) findViewById(R.id.btnLiteGrey);
        btnGrey = (Button) findViewById(R.id.btnGrey); //
        btnBlack = (Button) findViewById(R.id.btnBlack); //

        // set listener for when btnWhite is pressed
        btnWhite.setOnClickListener(new View.OnClickListener() {
            @Override
            public void onClick(View v) {
                // when clicked set background color to white
                background.setBackgroundColor(Color.parseColor("#FFFFFF"));
            }
        });

        // set listener for when lite grey is pressed
        btnlitegrey.setOnClickListener(new View.OnClickListener() {
            @Override
            public void onClick(View v) {
                // when clicked set background color to white
                background.setBackgroundColor(Color.parseColor("#C0C0C0"));
            }
        });


        // set listener does when btnGrey is pressed
        btnGrey.setOnClickListener(new View.OnClickListener() {
            @Override
            public void onClick(View v) {
                //
                background.setBackgroundColor(Color.parseColor("#666666"));
            }
        });
        /* Set listener does when btnBlack is pressed */
        btnBlack.setOnClickListener(new View.OnClickListener() {
            @Override
            public void onClick(View v) {
                //
                background.setBackgroundColor(Color.parseColor("#000000"));
            }
        });


    }


    @Override
    public boolean onCreateOptionsMenu(Menu menu) {

        // Inflate the menu; this adds items to the action bar if it is present.
        getMenuInflater().inflate(R.menu.linear_layout, menu);
        return true;
    }

    @Override
    public boolean onOptionsItemSelected(MenuItem item) {
        // Handle action bar item clicks here. The action bar will
        // automatically handle clicks on the Home/Up button, so long
        // as you specify a parent activity in AndroidManifest.xml.
        int id = item.getItemId();
        if (id == R.id.action_settings) {
            return true;
        }
        return super.onOptionsItemSelected(item);
    }

}
Here is my main.c file:
// Author: Aron Horan
// Date: 6 Mar 2014
// Final Year Project
// Version 1.1
// dsPIC30F3012

#include <xc.h>
#include <stdio.h>
#include <libpic30.h>
#include <p30F3012.h>

// Configuration settings
_FOSC(CSW_FSCM_OFF & FRC_PLL16); // Fosc=16x7.5MHz, Fcy=30MHz
_FWDT(WDT_OFF);                  // Watchdog timer off
_FBORPOR(MCLR_DIS);              // Disable reset pin

// Function prototypes
unsigned int read_analog_channel(int);

int main()
{
	int left_eye;
	int right_eye;

	// Configure UART
	U1BRG = 48;            // 38400 baud @ 30 MIPS
	U1MODEbits.UARTEN = 1; // Enable UART


	// Configure digital io
	TRISB = 0b1111111111110000;
	_TRISD0 = 0;

	// Configure analog inputs
	ADPCFG = 0b1111111100111111;// Only AN6 and AN7 are analog inputs
	ADCON1 = 0;                 // Manually clear SAMP to end sampling, start conversion
	ADCON2 = 0;                 // Voltage reference from AVDD and AVSS
	ADCON3 = 19;            	// Manual Sample, ADCS=9 -> Tad = 10*Tcy = 333ns
	ADCON1bits.ADON = 1;        // Turn ADC ON

	while(1)
	{
		left_eye = read_analog_channel(6); 	// read left colour sensor
		right_eye = read_analog_channel(7); // read right colour sensor
	         // for now I'm just using one sensor //
		 if (left_eye < 500) LATB = 0b0000; // stop
		 if ((left_eye > 500) && (left_eye < 2300)) LATB = 0b0101; //turn left
		 if ((left_eye > 2300) && (left_eye < 2850)) LATB = 0b1010; //turn right
         if (left_eye > 2850) LATB = 0b1001; // forwards
	}
	return 0;
}

// This function reads a single sample from the specified
// analog input. It should take less than 2.5us if the chip
// is running at about 30 MIPS.
unsigned int read_analog_channel(int channel)
{
	ADCHS = channel;          	// Select the requested channel
	ADCON1bits.SAMP = 1;      	// start sampling
	__delay32(30);            	// 1us delay @ 30 MIPS
	ADCON1bits.SAMP = 0;      	// start Converting
	while (!ADCON1bits.DONE);	// Should take 12 * Tad = 1.2us
	return ADCBUF0;
}
Here is a video of it in action:
Next thing I needed to do is to actually create an app that will send the Car to a given GPS location. I first created my own class that gets the bearing to my destination GPS location.
Here is my GetBearing class java file:
class bearing {
    double currlat;
    double currlon;
    double destlat;
    double destlon;
    double result;

    public bearing(double currlat,double currlon,double destlat,double destlon){
        this.currlat = currlat;
        this.currlon = currlon;
        this.destlat = destlat;
        this.destlon = destlon;


    }

    public double getbearing(){

        double longDiff = (destlon-currlon);

        double y= Math.sin(longDiff)*Math.cos(destlat);

        double x=Math.cos(currlat)*Math.sin(destlat)-Math.sin(currlat)*Math.cos(destlat)*Math.cos(longDiff);

		this.result= (Math.toDegrees(Math.atan2(y, x))+360)%360;;
        return result;
    }

}

public class GetApp{
    public static void main(String[] args){
	double myposition;
        bearing b= new bearing(53.11711711711712,-6.064233730537283,53.00269,-6.11625/);
        myposition= b.getbearing();
        System.out.println("Bearing=" +  b.getbearing() + "Degrees");
        }
}
This when run in the terminal gives an output of: Bearing = 157.34724074606925 Degrees
I then created a class that gets the distance to the given GPS location:
class distance {
    double currlat;
    double currlon;
    double destlat;
    double destlon;
    double result;
    double R= 6371; // km

	public distance(double currlat, double currlon, double destlat, double destlon){
        this.currlat = currlat;
        this.currlon = currlon;
        this.destlat = destlat;
        this.destlon = destlon;
    }

    public double getdistance(){

        double a = Math.sin(destlat / 2) * Math.sin(destlat / 2) + Math.sin(destlon / 2) * Math.sin(destlon / 2) * Math.cos(currlat) * Math.cos(destlat);
        double b = 2 * Math.asin(Math.sqrt(a));
        this.result= R * b;
        return result;
    }
}

public class getdistance{
    public static void main(String[] args) {
    double myposition;
    	distance d= new distance(53.11711711711712,-6.064233730537283,53.00269,-6.11625);
    	myposition= d.getdistance();
        System.out.println("Distance=" + d.getdistance() + "Meters");
    }
}
This when ran in the terminal prints out: Distance = 17644.880299646473 Meters
I then need to access the phones magnetic field sensor to determine which way the phone is pointing referenced from north. THis will give me back a number between 0 and 360 degrees.
I firstly created a layout xml file with one textview to display:
<RelativeLayout xmlns:android="http://schemas.android.com/apk/res/android"
    android:layout_width="match_parent"
    android:layout_height="match_parent"
    >

    <TextView
        android:id="@+id/tvHeading"
        android:layout_width="wrap_content"
        android:layout_height="wrap_content"
        android:layout_centerHorizontal="true"
        android:layout_marginBottom="40dp"
        android:layout_marginTop="20dp"
        android:text="Heading: 0.0" />

</RelativeLayout>
I then created a main java file:
package com.getheading.app;


import android.app.Activity;
import android.hardware.Sensor;
import android.hardware.SensorEvent;
import android.hardware.SensorEventListener;
import android.hardware.SensorManager;
import android.os.Bundle;
import android.widget.TextView;

public class MainActivity extends Activity implements SensorEventListener {


    // Declare some variables
    private SensorManager mSensorManager;
    TextView tvHeading;

    @Override
    protected void onCreate(Bundle savedInstanceState) {
        super.onCreate(savedInstanceState);
        setContentView(R.layout.activity_main);

        // Define the textview creatd in the layout
        tvHeading = (TextView) findViewById(R.id.tvHeading);

        //
        mSensorManager = (SensorManager) getSystemService(SENSOR_SERVICE);
    }

    @Override
    protected void onResume() {
        super.onResume();

        // for the system's orientation sensor registered listeners
        mSensorManager.registerListener(this, mSensorManager.getDefaultSensor(Sensor.TYPE_ORIENTATION),
                SensorManager.SENSOR_DELAY_GAME);
    }

    @Override
    protected void onPause() {
        super.onPause();

        // to stop the listener and save battery
        mSensorManager.unregisterListener(this);
    }

    @Override
    public void onSensorChanged(SensorEvent event) {

        // get the angle around the z-axis rotated
        float degree = Math.round(event.values[0]);

        tvHeading.setText("Heading: " + Float.toString(degree) + " degrees");

    }

    @Override
    public void onAccuracyChanged(Sensor sensor, int accuracy) {
        // not used
    }
}
Here is a video of it working:
I am now created all the applications and calculations I need to do my final application.
So I then created an application to get my current GPS (without pushing a button) and update it every time I change location. I then added my heading application so that I have both current GPS coordinates and heading.
I then added my “getDistanceBearing class with the two methods ” getDistance” and “getBearing” and called them when ever my location changed so that I recalculate the bearing and heading.
I then added two text views so that the user can enter the destination location coordinates.
Next I changed from using one background colour to control the motors to using two different coloured boxes to control the left and right motors independently.
Here is a screen shot of the layout:

Here is the xml layout file:
<?xml version="1.0" encoding="utf-8"?>
<LinearLayout xmlns:android="http://schemas.android.com/apk/res/android"
    android:layout_width="match_parent"
    android:layout_height="match_parent"
    android:orientation="vertical"
    android:weightSum="1">

    <TextView
        android:id="@+id/Heading"
        android:layout_width="wrap_content"
        android:layout_height="wrap_content"
        android:layout_marginLeft="10dp"
        android:layout_marginTop="10sp"
        android:text="Heading: unknown"
        android:textSize="15sp"/>

    <TextView
        android:id="@+id/currlat"
        android:layout_width="wrap_content"
        android:layout_height="wrap_content"
        android:layout_marginLeft="10dp"
        android:text="Curr Lat: unknown"
        android:textSize="15sp" />

    <TextView
        android:id="@+id/currlon"
        android:layout_width="wrap_content"
        android:layout_height="wrap_content"
        android:layout_marginLeft="10dp"
        android:text="Curr Long: unknown"
        android:textSize="15sp" />

    <TextView
        android:id="@+id/Bearing"
        android:layout_width="wrap_content"
        android:layout_height="wrap_content"
        android:layout_marginLeft="10dp"
        android:text="Bearing: unknown"
        android:textSize="15sp"/>

    <TextView
        android:id="@+id/Distance"
        android:layout_width="wrap_content"
        android:layout_height="wrap_content"
        android:layout_marginLeft="10dp"
        android:text="Distance: unknown"
        android:textSize="15sp"/>
    <TextView
        android:id="@+id/Direction"
        android:layout_width="wrap_content"
        android:layout_height="wrap_content"
        android:layout_marginLeft="10dp"
        android:layout_marginBottom="10dp"
        android:text="Direction: unknown"
        android:textSize="15sp"/>

    <LinearLayout
        android:layout_width="fill_parent"
        android:layout_height="80dp"
        android:layout_marginBottom="100dp"
        android:orientation="horizontal"
        android:padding="3sp" >

        <EditText
            android:id="@+id/Destlat"
            android:layout_width="fill_parent"
            android:layout_height="wrap_content"
            android:layout_marginTop="5sp"
            android:layout_weight="1.0"
            android:hint="Dest lat"
            android:inputType="numberDecimal|numberSigned"
            android:lines="1" />

        <EditText
            android:id="@+id/Destlon"
            android:layout_width="fill_parent"
            android:layout_height="wrap_content"
            android:layout_marginTop="5sp"
            android:layout_weight="1.0"
            android:hint="Dest Lon"
            android:inputType="numberDecimal|numberSigned"
            android:lines="1" />

        <Button
            android:id="@+id/latlong_button"
            android:layout_width="wrap_content"
            android:layout_height="wrap_content"
            android:layout_marginTop="5sp"
            android:text="Go!" />
    </LinearLayout>

    <LinearLayout
        android:id="@+id/LinearLayout02"
        android:layout_height="wrap_content"
        android:layout_width="fill_parent"
        android:layout_alignParentBottom="true">

        <LinearLayout
            android:id="@+id/left_layout"
            android:orientation="horizontal"
            android:layout_width="90dp"
            android:layout_height="220dp"
            android:layout_weight="1">
        </LinearLayout>

        <LinearLayout
            android:id="@+id/right_layout"
            android:orientation="horizontal"
            android:layout_width="90dp"
            android:layout_height="220dp"
            android:layout_weight="1">
        </LinearLayout>

    </LinearLayout>

</LinearLayout>
Here is my main java file:
package com.displaygps2.app;

import android.app.Activity;
import android.content.Context;
import android.graphics.Color;
import android.hardware.Sensor;
import android.hardware.SensorEvent;
import android.hardware.SensorEventListener;
import android.hardware.SensorManager;
import android.location.Criteria;
import android.location.Location;
import android.location.LocationListener;
import android.location.LocationManager;
import android.os.Bundle;
import android.view.View;
import android.widget.EditText;
import android.widget.LinearLayout;
import android.widget.TextView;
import android.widget.Toast;


public class MainActivity extends Activity implements SensorEventListener, LocationListener, android.view.View.OnClickListener{
    // Declare some variables
    public TextView latitudeField;
    public TextView longitudeField;
    public TextView DestlatField;
    public TextView DestlonField;
    public TextView bearingField;
    public TextView distanceField;
    public TextView Heading;
    public TextView Direction;

    LinearLayout left_motor;
    LinearLayout right_motor;

    public LocationManager locationManager;
    public String provider;
    public SensorManager mSensorManager;

    public int heading;
    public int bearing;
    public double distance;
    public int direction;
    public double destlat;
    public double destlon;


    /** Called when the activity is first created. */

    @Override
    public void onCreate(Bundle savedInstanceState) {
        super.onCreate(savedInstanceState);
        setContentView(R.layout.activity_main);


        // setup backgrounds to control motors
        left_motor = (LinearLayout) findViewById(R.id.left_layout);
        right_motor = (LinearLayout) findViewById(R.id.right_layout);

        latitudeField = (TextView) findViewById(R.id.currlat);
        longitudeField = (TextView) findViewById(R.id.currlon);
        DestlatField = (TextView) findViewById(R.id.Destlat);
        DestlonField = (TextView) findViewById(R.id.Destlon);
        bearingField = (TextView) findViewById(R.id.Bearing);
        distanceField = (TextView) findViewById(R.id.Distance);

        Heading = (TextView) findViewById(R.id.Heading);
        Direction = (TextView) findViewById(R.id.Direction);
        View goButton = findViewById(R.id.latlong_button);
        goButton.setOnClickListener(this);


        // Get the location manager & sensor manager
        locationManager = (LocationManager) getSystemService(Context.LOCATION_SERVICE);
        mSensorManager = (SensorManager) getSystemService(SENSOR_SERVICE);


        // Define the criteria how to select the location provider
       Criteria criteria = new Criteria();
        provider = locationManager.getBestProvider(criteria, false);
       Location location = locationManager.getLastKnownLocation(provider);

        // Initialise the location fields //
        if (location != null) {
            System.out.println("Provider " + provider + " has been selected.");
            onLocationChanged(location);
        } else {
            latitudeField.setText("Current location not available");
            longitudeField.setText("Current location not available");
        }
    }

    /* Request updates at startup */
    @Override
    protected void onResume() {
        super.onResume();
        locationManager.requestLocationUpdates(provider, 100, 1, this); // 30seconds

        // for the system's orientation sensor registered listeners
        mSensorManager.registerListener(this, mSensorManager.getDefaultSensor(Sensor.TYPE_ORIENTATION),
                SensorManager.SENSOR_DELAY_GAME);
    }

    /* Stop the location listener updates when Activity is paused */
    @Override
    protected void onPause() {
        super.onPause();
        locationManager.removeUpdates(this);

        // stop the listener to save battery
        mSensorManager.unregisterListener(this);
    }


    @Override
    public void onLocationChanged(Location location) {
        double currlat = (float) (location.getLatitude());
        double currlon = (float) (location.getLongitude());
        latitudeField.setText(String.valueOf("Curr Lat: " + currlat));
        longitudeField.setText(String.valueOf("Curr Long: " + currlon));

        bearingDistance b = new bearingDistance(currlat, currlon, destlat,destlon);
            b.getbearing();
            b.getdistance();

            bearing = b.getbearing();
            distance = b.getdistance();

        bearingField.setText(String.valueOf("Bearing: " + b.getbearing() + " Degrees"));
        distanceField.setText(String.valueOf("Distance: " + b.getdistance() + " Meters"));


    }

    @Override
    public void onStatusChanged(String provider, int status, Bundle extras) {
        // TODO Auto-generated method stub

    }

    @Override
    public void onProviderEnabled(String provider) {
        Toast.makeText(this, "Enabled new provider " + provider,
                Toast.LENGTH_SHORT).show();

    }

    @Override
    public void onProviderDisabled(String provider) {
        Toast.makeText(this, "Disabled provider " + provider,
                Toast.LENGTH_SHORT).show();
    }

    @Override
    public void onSensorChanged(SensorEvent event) {
        // get the angle around the z-axis rotated
        int degree = Math.round(event.values[0]);

        Heading.setText("Heading: " + Float.toString(degree) + " degrees");

        direction = Math.abs(bearing - heading);
        Direction.setText("Direction to Turn: " + direction + "degrees");

        heading = degree;

        if (heading > bearing){
            turn_left();
            if (direction < 10){
                go_straight();
            }
            if (distance < 1){
                stop();
            }
        }
        if (heading < bearing){
           turn_right();
            if (direction < 10){
                go_straight();
            }
            if (distance< 1){
               stop();
            }
        }

    }

    @Override
    public void onAccuracyChanged(Sensor sensor, int accuracy) {
        // not used
    }


    /** Motor Control **/
    public void go_straight(){
        right_motor.setBackgroundColor(Color.parseColor("#FFFFFF"));
        left_motor.setBackgroundColor(Color.parseColor("#FFFFFF"));
    }
    public void turn_left(){
        right_motor.setBackgroundColor(Color.parseColor("#FFFFFF"));
        left_motor.setBackgroundColor(Color.parseColor("#000000"));
    }
    public void turn_right(){
        right_motor.setBackgroundColor(Color.parseColor("#000000"));
        left_motor.setBackgroundColor(Color.parseColor("#FFFFFF"));
    }
    public void stop(){
        right_motor.setBackgroundColor(Color.parseColor("#000000"));
        left_motor.setBackgroundColor(Color.parseColor("#000000"));
    }

    @Override
    public void onClick(View v) {

        // Read the latitude and longitude from the input fields when button is pressed
        EditText latText = (EditText) findViewById(R.id.Destlat);
        EditText lonText = (EditText) findViewById(R.id.Destlon);
        String latString = latText.getText().toString();
        String lonString = lonText.getText().toString();

        destlat = Double.parseDouble(latString);
        destlon = Double.parseDouble(lonString);

    }
}
